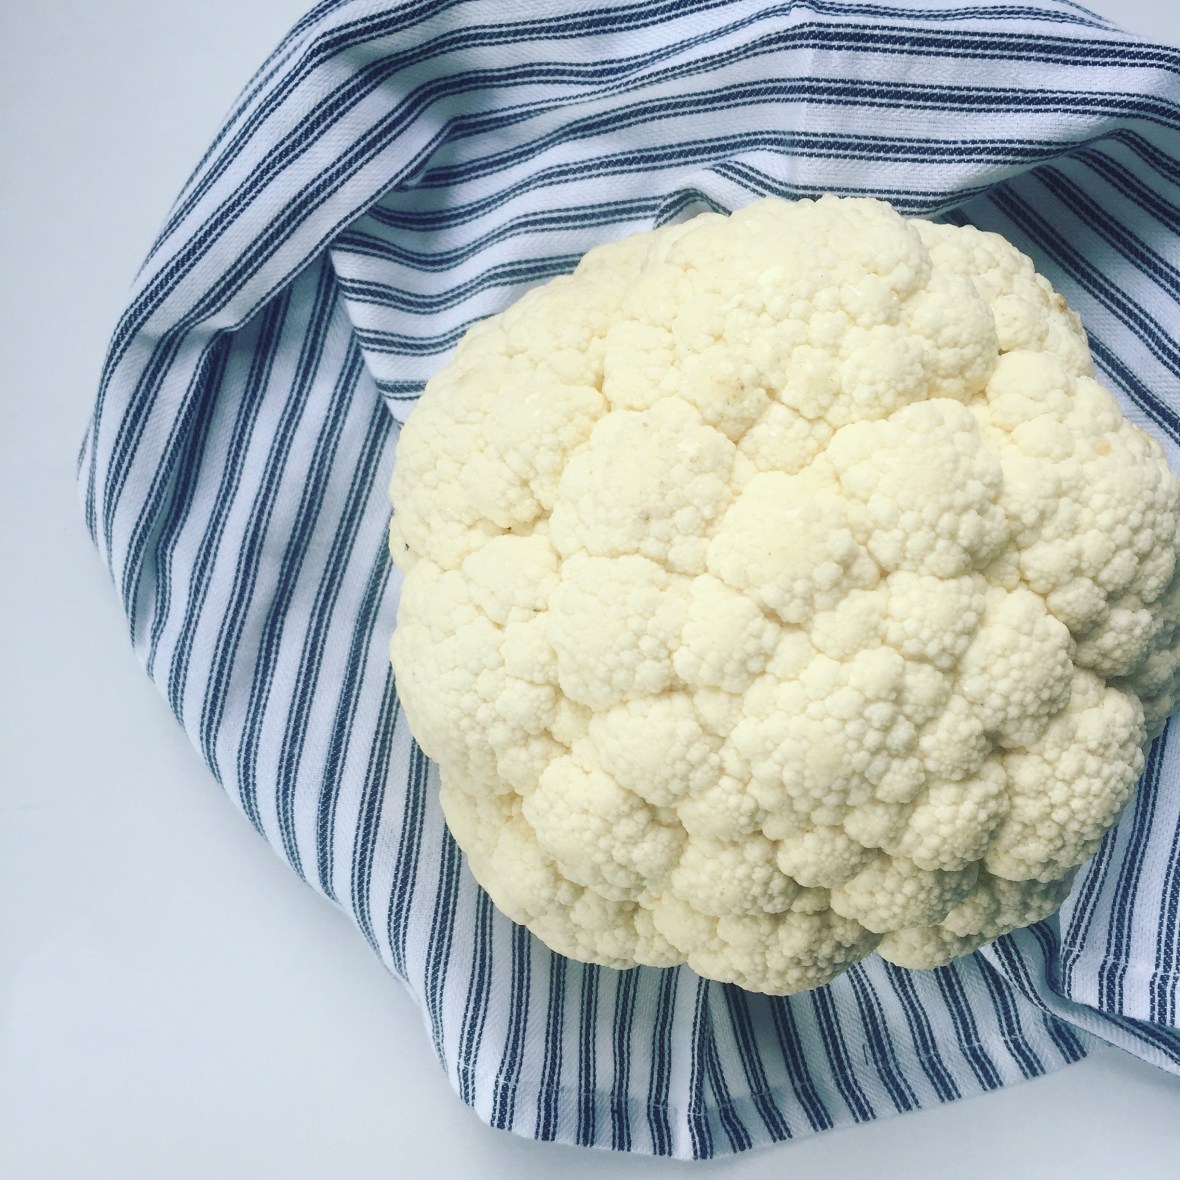
Parmesan + Thyme Cauliflower Rice

IMG_3467

Cauliflower is one of those vegetables I’ve always struggled eating until recently. In efforts to get my two blonde babes to keep an open mind about all foods, I figured I should do the same and simply try different variations of cooking said vegetable.

One tried and true method I’ve found to get almost anyone to enjoy a vegetable they normally turn up their nose to is to roast it in the oven with fresh herbs. Herbs provide such a strong punch of flavor simply + naturally, and in no time at all completely change the flavor of any dish. Roasting vegetables with a little EVOO also brings out the vegetable’s natural sweetness and enhances it’s flavor so nicely that I find myself using this technique when I’m in a cooking rut or short on time.

I digress. This recipe doesn’t roast the cauliflower, so you may be wondering why I even bring it up. Two reasons: 1.) be bold + take a vegetable you’re not all that keen of and roast it. Trust me. 2.) after using the vegetable in a new way – it will open your mind up about trying other preparations as it did for me with cauliflower.

This recipe is so simple and has become a favorite side dish with any protein. It’s also a fun way to change up the usual carb side option with a flavorful veggie substitute. I encourage you to use your favorite herb in this – thyme is lovely, but I can think of a few substitutes that would also go well, like chives, sage or rosemary. Happy cooking and thanks for stopping by!

Ingredients:

  • 1 head cauliflower, preferably organic
  • 1/2 yellow onion, diced
  • 1/2 cup grated parmesan cheese
  • 4 tbsp EVOO
  • 2 tsp ground pepper
  • 1.5 tsp garlic salt
  • 2 tbsp fresh thyme, plus more for garnish


Method:

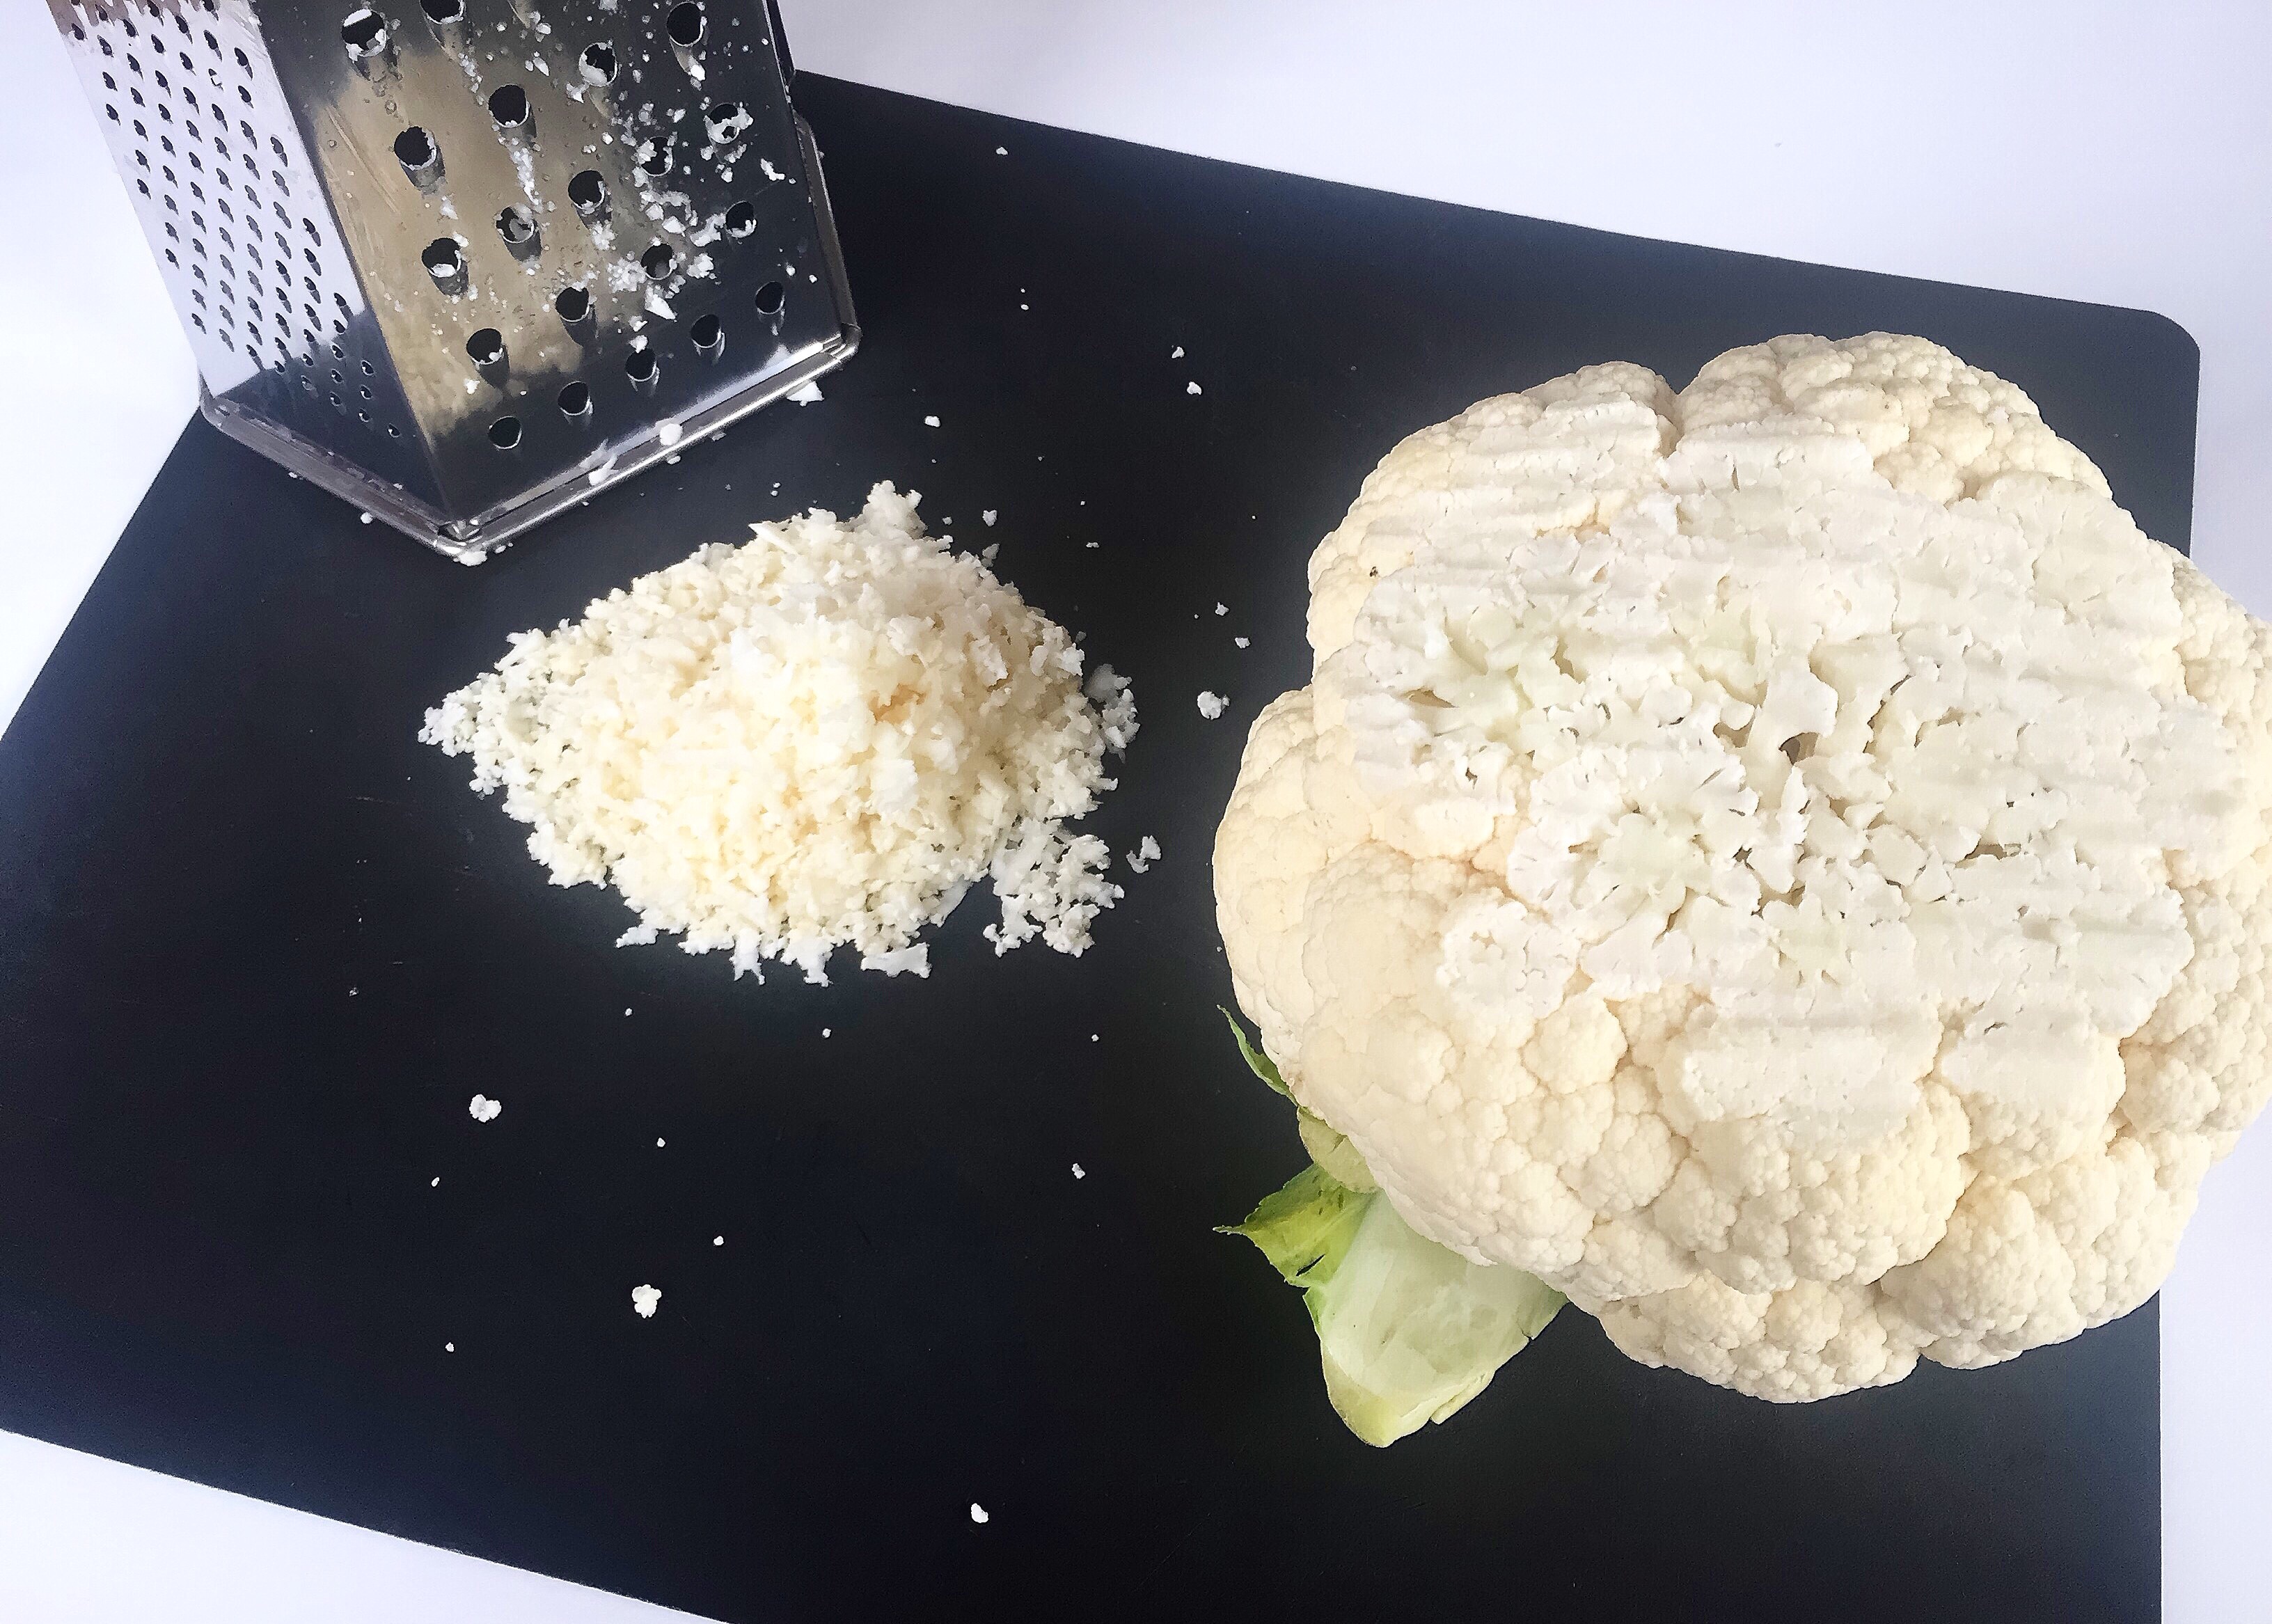
  1. Grate the head of cauliflower, sticking to the portions you would eat. It will grate easier if you leave the head whole rather than cutting the segments off the stalk.
  2. In a large pan on your stovetop, add the EVOO, diced onions, grated cauliflower, chopped thyme, garlic salt + pepper. Saute 10-12 minutes over medium heat, stirring frequently. 
  3. Add the parmesan cheese and saute an additional 5 minutes. Remove from heat + serve with fresh thyme garnished atop.


IMG_4359

Sparkling Rose + Strawberry Frosted Cupcakes

IMG_3563

Typically speaking, my sweet tooth isn’t as strong as the savory one, but a cupcake baked with Sparkling Rose? Completely up my alley! Rose all day, especially the sparkling kind. I even have a shirt with said statement.

I was really pleased with how they turned out; light + fluffy and filled with the flavors of the bubbly wine. The addition of the strawberry frosting sweetens them up and is the perfect topping.

These really are the perfect way to jazz up the average cupcake. Valentine’s Day is a few days away, why not skip the overpriced dozen roses and pop a bottle of sparkling rose to bake these for your loved one? The recipe only uses 3/4 cup, so you’ll have plenty left to sip together while you eat them.

Recipe yields 16 cupcakes.

IMG_3565

Ingredients:

For the cupcakes:

  • 1/2 cup organic butter, room temp
  • 1 1/4 cup sugar
  • 2 organic eggs
  • 1 tbsp pure vanilla extract
  • 1.5 cups all purpose flour
  • 1.5 tsp baking powder
  • 3/4 cup whole milk
  • 3/4 cup sparkling rose (as with any recipe, only use a wine you would drink with flavors you enjoy.)

For the frosting:

  • 2 lb. bag powdered sugar
  • 1 cup organic butter, room temp
  • 1/4 cup whole milk
  • 1 tsp pure vanilla extract
  • 1/2 cup puréed strawberries
  • Pinch cream of tartar

Method:

For the cupcakes:

  1. Preheat oven to 350. Line cupcake pan with liners and set aside.
  2. In kitchen aid mixer fitted with paddle attachment, cream together butter + sugar for 2 minutes. Add vanilla & eggs one at a time and mix until combined, scraping down the sides.
  3. Add the milk and sparkling rose into a 2 cup measuring cup. The mixture will foam up.
  4. Add the dry ingredients to the mixer & mix until incorporated. Add in the milk + rose mixture and fold in with a spatula.
  5. Fill each cupcake liner 3/4 to the top.
  6. Bake 15-18 minutes or until a toothpick comes out clean from the center of the cupcake. Let cool completely before frosting.

To make the frosting:

  1. In your kitchen aid mixer fitted with the whisk attachment, whisk together butter & half the bag of powdered sugar 5 minutes.
  2. Add remaining ingredients & whisk an additional 5 minutes. Decorate each cupcake with frosting.
  3. You can store the extra frosting in the fridge for up to 2 weeks, or in the freezer for 2 months.

IMG_3566

Parmesan Garlic + Dill Drumsticks

IMG_3045

There’s something to be said about chicken wings + football. Theirs is a marriage that has withstood countless years and birthed many flavors. I love them all, truthfully, and any excuse I can get to eat a chicken wing (or drumstick in this instance) is okay by me. With Superbowl Sunday just one week away, menus are being planned + fans across the nation will cheer on their favorite (or favorite of the two options, anyway) teams.

Bring these to the table.

This recipe was inspired by one of my favorite go-to recipes when I’m in a time crunch, and one my family loves as well. Pasta, tossed in butter, garlic, chives, parmesan cheese (and a little pasta water), topped with red pepper flakes and dill for mom and dad. The combination atop these drumsticks took the simple flavors to a whole different level.

They’re packed with flavor, moist as all get out + the definition of easy to make. Try them. Then add them to your repertoire of recipes to make when time is limited or you’re entertaining a crowd.

I chose to make large drumsticks for this recipe, which yielded 5 pieces. Prefer a mixture of wings + drummies? Go for it. Just adjust your cooking time if needed.

Ingredients:

  • 1.25 lbs. Just Bare Brand Chicken Drumsticks
  • 1.5 tbsp. EVOO
  • 1 tbsp. garlic salt
  • 1 tbsp. black pepper
  • 4 tbsp. butter, melted
  • 1 tsp. minced garlic
  • 1 tbsp. red pepper flakes
  • 2 tbsp. fresh dill, chopped
  • 2 tbsp. fresh chives, minced
  • 1 cup freshly grated parmesan cheese (I used a microplane to achieve a fine grate)

Method:

  1. Preheat oven to 425. Line a baking sheet with parchment paper.
  2. Place the drumsticks evenly spaced on the lined baking sheet + lightly season both sides of each drumstick with the garlic salt + pepper.
  3. Lightly drizzle the EVOO across each drumstick.
  4. Bake 25 minutes, or until juices run clear.
  5. While chicken bakes, chop & mince the herbs + garlic and grate the parmesan cheese.
  6. Melt the butter in a small saucepan on your stovetop + remove from heat. Add the minced garlic to the butter.
  7. When the drumsticks are cooked, immediately toss them with the butter, garlic, herbs, red pepper flakes + parmesan cheese. Serve hot + enjoy!

IMG_3050

IMG_3047

IMG_3046

Oatmeal Chocolate Chip Cookies | Gluten Free

IMG_2902

These cookies are insane. Though I am not a celiac, many of my close friends + family are either gluten intolerant or suffer from celiac disease. Whenever possible, I try to create a copy cat recipe that tailors to those friends + family. Sometimes it works out well, and then every once in a while, it’s a huge success (like my chocolate cupcakes recipe, found here.)

These cookies are, in my opinion, a huge success! Buttery, soft + chewy and all the flavors of a traditional cookie, but sans any gluten products. I made these on a mission one afternoon to test on my family as Guinea pigs, and waited anxiously for their response. Now, my kids and husband are pretty intense about their cookies. Not one of them guessed that what they were eating weren’t one of my usual recipes.

What I love most about these cookies is how light + chewy they are. Most of the gluten free cookies I’ve enjoyed have been fairly dense. While that doesn’t equate to a bad cookie – this one is so close to its original ancestor made with flour.

I encourage you to try this recipe. I’m confident you’ll love it as much as we do!
Recipe yields approximately 40 two inch diameter cookies.

Ingredients:

  • 1 cup organic butter, room temperature
  • 1/2 cup brown sugar, packed
  • 1/2 cup granulated sugar
  • 1.5 tbsp pure vanilla extract
  • 2 organic eggs
  • 2.5 cups almond flour (I used Bob’s Red Mill)
  • 1 cup brown rice flour (I used Bob’s Red Mill)
  • 1 cup organic rolled oats (not the quick oats)
  • 1.5 tbsp baking powder
  • 10 oz bag Chocolate chips (I used Enjoy Life Brand)

Method:

  1. Preheat oven to 350. Line baking sheets With parchment paper or silpat liners.
  2. Cream together butter + sugars 2 minutes
  3. Add vanilla extract + eggs until incorporated.
  4. Add dry ingredients + mix until blended. Stir in chocolate chips.
  5. Using a tablespoon or a cookie scoop (I used the oxo brand cookie scoop), place 12 drops of cookie dough on the pan, evenly spaced.
  6. Bake 10-11 minutes, or until the edges turn slightly golden brown.

IMG_2884.JPG

IMG_2890.JPG

Brandy Vanilla

IMG_2542

If there’s one “secret” I’ve never forgotten that my grandma shared with me, it was to always add a little more vanilla into any recipe than it called for when baking. I often spent a good majority of my summers in my grandma’s cozy, apple decorated kitchen in North Minneapolis playing cribbage, baking + holding onto every word she spoke. Her laugh was contagious and her heart poured out love to anyone and everyone she met, often via something delicious from her oven.

One day while baking chocolate chip cookies, my cousin and I elbow deep in the batter (because that was the best way to mix it, after all) my grandma looked at me and said, “Julia – two things make recipes better. The first is to always cook or bake with love. If it comes from your heart, the food will reflect that. It doesn’t have to be fancy, the love will make it special. The second is to add another pour of vanilla than the recipe calls for.”

I’ve since told these very same words of advice to my daughters when we bake together. My four year old knows these tricks and even blows kisses into every ingredient.

If you follow me on Instagram, you may recall this Christmas I received a gift that moved me beyond words. Every year my grandma would make a batch of homemade vanilla. The last year of her life (12 years ago) we each received a bottle for Christmas. My brother saved his, aged it & split it three ways for himself, my mom and me to share. It was the most selfless + thoughtful gift. I’ve already used it once, but plan to save it for special recipes or occasions.

In honor of her memory – I’m sharing the recipe with you. It makes the most flavorful vanilla and is worth the wait during the aging process. As with a fine wine, the longer you age it, the better it becomes. Enjoy, friends!

IMG_1190

Ingredients:

  • 750 ML bottle of Brandy (My grandma used Christian Brothers)
  • 3-4 Madagascar vanilla beans, split
  • Clean glass liter bottle with a stopper (you can find these at any craft store or IKEA.)

Method:

  1. Using a sharp knife, split the vanilla beans down the middle + place them in the liter bottle.
  2. Pour the brandy into the liter bottle + close. Gently swirl the bottle.
  3. Store in a dark closet, gently swirling every month + return to the closet. Age a minimum of 12 months before using.

IMG_2543

IMG_2544

Cheesy Jalapeño + Chicken Skillet Dip

IMG_2516

I finally got around to buying myself a skillet, and I really couldn’t be more excited. It’s long overdue + quite frankly a bit embarrassing that I waited so long because there have been countless recipes I’ve wanted to make that required such a kitchen tool. (One of which was a recent recipe posted by Amanda over at Heartbeet Kitchen’s: Hot Gruyere Skillet Chicken Dip from which I drew a little inspiration for this recipe.)

This dip was a pretty fun way to break in my recent prized purchase. It’s loaded with some of my favorite flavors, brings just enough punch of heat & is fairly hearty with the addition of chicken thighs. I plan to make this dip come Superbowl Sunday + am confident it will be a hit should you choose to make it too.

I also love this dip because it utilizes some of my favorite brands. Cabot Cheese Co-op is one of my favorite sharp cheddars – not just because of the flavor, but because they have a connection with each and every farm from where they secure their milk to make their cheeses. They believe in keeping ingredients pure, and you can taste the difference. Just Bare Chicken also has a philosophy of which I love, which is providing consumers with chicken sans all the fillers, hormones + antibiotics.

I hope you find yourself enjoying this dip with loved ones – be it in front of the television watching the Super Bowl, or just because you want to share some love over a cheesy, spicy chicken dip.

Ingredients:

  • 3 boneless, skinless chicken thighs (Just Bare Chicken brand)
  • 1 cup minced shallots
  • 1.5 cups diced fresh jalapeños
  • 1/4 cup chicken broth
  • 4 tbsp. extra virgin olive oil, divided
  •  1 cup real mayo
  • 8 oz block Cabot extra sharp cheddar, shredded
  • 3/4 cup shredded parmesan
  • Garlic salt + freshly cracked pepper for the chicken

IMG_2518

IMG_2504

Method:

  1. Season a 10 1/4″ skillet by brushing 1 tbsp evoo around the bottom + sides. Preheat oven to 350.
  2. Shred cheeses + set aside. Mince the shallot + dice the jalapeño. Set aside.
  3. Heat the skillet on stovetop over medium heat. Lightly season the chicken thighs with garlic salt + pepper. Add 2 tbsp evoo to the skillet & cook the chicken thighs until no longer pink, about 4-5 minutes on each side. Remove chicken from pan + dice into bite sized pieces. Do not rinse the skillet.
  4. Add additional 1 tbsp evoo to pan & add the jalapeños + shallots. Cook 2 minutes, allowing the pieces to brown.
  5. Add the 1/4 cup chicken stock to the skillet and de-glaze by scraping the browned pieces off the bottom of the pan. Add the chicken back into the skillet.
  6. Reduce the heat to low + add the 1 cup mayo + shredded cheeses to the skillet. Stir to combine, remove from the stovetop and transfer to the pre-heated oven.
  7. Bake 15-20 minutes, until bubbling. Serve hot + enjoy!

IMG_2517

This recipe is far and away my favorite when it comes to a chocolate cupcake. They’re dangerously dark + chocolatey and super moist. I’ve brought them to many a get together where people asked me for the recipe. I love sharing it with them + seeing the disbelief when I tell them they’re gluten free…and vegan.

Many people follow a vegan or gluten free lifestyle – be it by choice or necessity and I applaud them. I had to follow a lifestyle like this for a while when my girls were born to try and ease their reflux + food sensitivities. It was really a challenge for me, but one I tried hard to embrace. In the end, both kids had intolerances to nuts as well and had to go on prescription formulas – but this was what led me to be much more active in the kitchen and in the grocery stores from an ingredients perspective.

I missed butter. And cheese. I can’t forget about cheese. I digress…

My mom suffers from a gluten sensitivity and I created this in the summer of 2014 when we were celebrating our birthdays. No one knew they lacked any gluten or animal bi-products, and neither will you!

Deep, dark, chocolate bundles of joy, these are. Once you make them, they may quickly become your favorite chocolate cupcake recipe as well!

Recipe yields 22 cupcakes.

IMG_1917

Ingredients:

For the cupcakes:

  • 1.5 cups Almond flour (I used Bob’s Red Mill)
  • 1.5 cups Brown Rice flour (also Bob’s Red Mill)
  • 1/2 cup dark chocolate cocoa powder
  • 1.75 cups sugar
  • 1/2 cup canola oil
  • 2 cups dark chocolate almond milk (I used Silk)
  • 1 tsp. coffee extract
  • 1.5 tbsp. pure vanilla extract
  • 1/2 tsp. salt
  • 1 bag dark chocolate chips (I used Enjoy Life Foods)

For the frosting:

  • 2 cups vegetable shortening. (If you’re not sticking to the vegan theme here, sub room temp butter for shortening. I used organic unsalted.)
  • 2 lb. bag powdered sugar
  • 3/4 cup dark chocolate cocoa powder
  • 1 tbsp. pure vanilla extract
  • 1/4 – 1/3 cup almond milk (or whole milk)
  • pinch cream of tartar (to stiffen the frosting)

Method:

  1. Preheat oven to 350. Line two muffin pans with cupcake liners + set aside.
  2. In your Kitchen-Aid mixer fitted with the paddle attachment, blend canola oil + sugar for 2 minutes.
  3. Add extracts + chocolate almond milk & mix until combined.
  4. Add all dry ingredients and blend until incorporated. Stir in chocolate chips.
  5. Fill cupcake liners 3/4 full + bake 22-25 minutes. Let cool completely before frosting.

To make the frosting:

  1. Cream together the shortening + 1/3 bag of the powdered sugar & 1/4 cup milk for 5 minutes on medium speed.
  2. Add in the vanilla extract, cocoa powder, cream of tartar + remainder of the powdered sugar + mix an additional 5 minutes on medium speed.
  3. If the frosting is still too dry, add the additional milk 1 tbsp. at a time until desired consistency is reached. Pipe or spread atop each cupcake.

IMG_1952

Habanero Pomegranate Margarita

IMG_1513-2

I don’t know about you – but I’m an aficionado of all things spicy. Be it food or drink, I prefer it on the hotter side. There’s a saying in Minnesota about spice referred to as “Minnesota hot.” Whenever we order something at a restaurant and inquire about the heat level a common response is to use that term, which basically means it’s as mild as tomato. Apparently we midwesterners as a whole aren’t a part of the some who like it hot club. If you run with this crowd: this drink isn’t for you!

One of my favorite restaurants in Minneapolis has a habanero passion fruit margarita and it’s where I drew inspiration for this cocktail. It’s anything but mild and not for the faint of heart. In fact, you’re thoroughly warned when you order it that it is anything BUT Minnesota hot. For all my local friends – next time you hit up Bar La Grassa, order the habanero passion fruit  margarita. Or two.

The keys to this margarita are:

  1. Plan ahead. The infusing of the peppers in the tequila takes a minimum of 2 weeks.
  2. Buy your habaneros as fresh as possible, preferably from a farmers market or co-op type setting. The box stores produce is not as ideally fresh (thus packing the amount of desired heat.)

I love margaritas but rarely order them unless I know the restaurant makes it without the sugary, overly sweetened sweet + sour mix. This has no added refined sugars. Its spicy but slightly sweet with all the usual citrus notes. Enjoy amongst friends or at home with your special someone. Spice is a natural aphrodisiac, after all.

Recipe yields one bottle of habanero tequila, with a directions to make one cocktail. Cheers!

Ingredients:

For the tequila:

  • One 750 ml bottle of silver tequila (like any food or beverage, the quality of ingredients only make the beverage.)
  • 6 habanero peppers, pith + seeds removed

For the cocktail: 

  • 1.5 oz. of the habanero infused tequila
  • .5 oz triple sec
  • 1/4 cup lime sparkling water (I used H2OH lemon-lime)
  • The juice of 1 lime
  • 2 tbsp 100% pomegranate juice (I used POM)
  • Kosher salt + lime wedge for garnish (optional)

Method:

  1. 2 weeks prior to consuming, remove stems, pith + seeds from the habanero peppers and place them in the tequila bottle. After 2 weeks, either strain out the tequila from the peppers and discard the peppers, or leave them in the tequila for further heat.
  2. Using an 8 oz. glass, salt the rim. Fill the glass with ice & pour the tequila + triple sec over the ice. Squeeze in the juice from the lime & add in the sparkling water + POM juice.
  3. Gently stir + garnish with a lime. Enjoy.


IMG_0286

Peppermint Chocolate Crunch Bars

IMG_0651

I’m not gonna lie: I’m pretty excited about these candy bars. Who hasn’t had a Nestle Crunch bar? Chocolate meets crunch? Genius. But THESE!! In my opinion these beauties are the Crunch bar re-incarnated in minty fashion, only better! The best part of these is the non GMO + non guilt factor that comes along with them!

A few years ago, I discovered the company Enjoy Life Foods when my oldest daughter was struggling with food intolerances. Fast forward to second daughter facing the same issues and I was convinced part of the reason so many parents are seeing food intolerances in their infants + toddlers (not to mention many adults too) were specifically linked to what is in our foods now days. The processing, the soy, the GMO…we have all encountered this on some level.

Whenever possible, I aim to remove these things from my kitchen. It’s not a perfect science yet, but as often as I can I try to create tasty dishes sans all the bad stuff. Enjoy Life Foods embraces this lifestyle and offers so many delicious options for folks struggling with the 8 common allergens. Their products are available in many grocery stores – but I always find the largest selection at my local Co-op.

These are made with Enjoy Life Foods semi-sweet chocolate chips, Crunchy Flax + some peppermint extract. The definition of simple! Make these for the holidays and give them out as gifts; everyone will thank you!

Ingredients:

  • 16 oz Enjoy Life Foods semi-sweet chocolate chips
  • 1 cup Enjoy Life Foods Crunchy Flax cereal
  • 1 tsp pure peppermint extract (I used JR Watkins brand)

IMG_0655

Method:

  1. Line a 9×9″ pan with parchment paper & set aside.
  2. Melt the chocolate chips over a double boiler or in the microwave in a glass bowl, stirring after each 30 second interval until melted.
  3. Stir the 1 tsp pure peppermint extract into the chocolate.
  4. Stir in the cup of flax crunch cereal.
  5. Pour the mixture into the parchment lined pan & refrigerate for 30 minutes. Remove from the fridge & cut into desired sized pieces.

IMG_0652

Krumkake

IMG_0402

Everyone has a favorite Christmas cookie; mine are undoubtedly Krumkake. They remind me of both my grandma and heritage, boasting a classically delicious flavor. Krumkake is a Norwegian waffle cookie, cooked paper thin on a special iron then rolled into a cone shape.

The process of making these are fairly simple but require a good amount of time and patience. The key is getting the iron at just the right temperature to cook evenly on each side. It takes one or two goes to achieve this method, but don’t give up! I promise the patience is worth the effort + the end result is a crumbly, delicate cookie with a subtle punch of vanilla and cinnamon.

Once made + cooled, these can be stored in an airtight container in the freezer for a few weeks. Feel free to add a cream filling if you’d like or dust them with powdered sugar. Or leave them as is + enjoy with a cup of coffee. Enjoy your holiday baking & thanks for stopping by!

Ingredients:

  • 1 cup sugar
  • 1/2 cup organic butter, room temp
  • 2 organic eggs
  • 1 cup whole milk
  • 1.5 cups unbleached, all purpose flour
  • 1.5 tsp ground cinnamon
  • 1 tbsp pure vanilla extract

Method:

  1. Cream together the butter + sugar for 2 minutes using a mixer or in your Kitchen Aid mixer fitted with the paddle attachment.
  2. One at a time, beat in the eggs until the batter thickens slightly & takes on a slight yellow tint.
  3. Mix in the flour, milk, cinnamon + vanilla extract until just combined. Let the batter sit at room temperature for 30 minutes.
  4. Over your gas range, heat the Krumkake iron on medium heat until a drop of water sizzles when dropped on the center of the closed iron.
  5. Open the iron + lightly coat with nonstick spray. Spoon 1 tbsp of batter in the middle of the iron & close.
  6. Cook for 1 minute on each side until the cookie is golden brown.
  7. Open the iron & Gently remove using the tip of a sharp knife. Roll immediately into a cone shape. (The iron should come with a cone roller, if it doesn’t, roll them by hand in a cigar shaped manner.)
  8. Allow the cookies to cool on a rack. They will crisp up as they cool.
  9. Repeat until the batter is used, adding a tablespoon of water as necessary if the batter becomes too thick.